

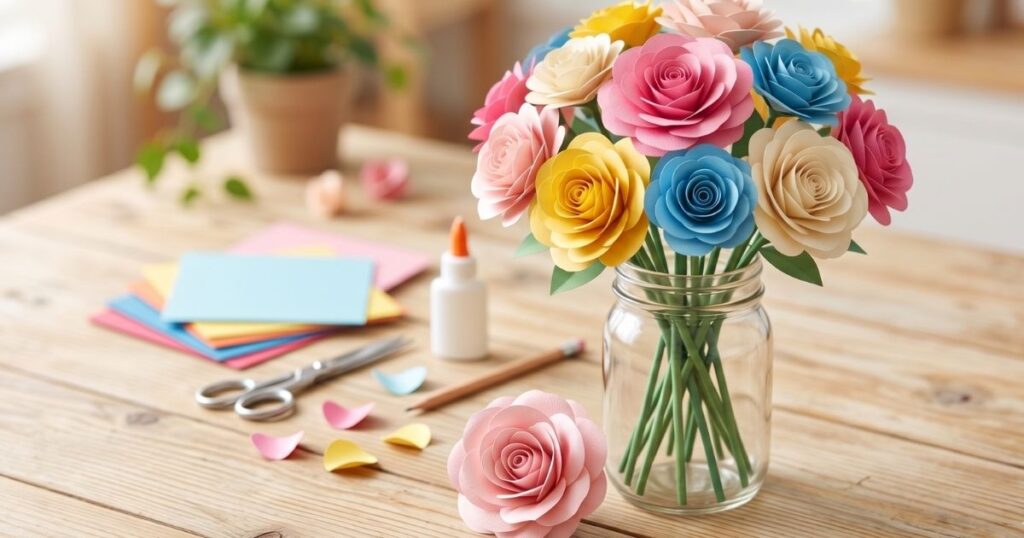
A complete step-by-step guide — from a single sheet of paper to a stunning bloom you can keep forever.
“Paper flowers never wilt, never need watering, and can be made in any color you dream of. Once you know the technique, you’ll never look at a piece of paper the same way again.”
Gather these simple supplies before starting. Most of them you likely already have at home — no special craft store trip needed!
Your Supply Checklist
Start by cutting 5 circles from your colored paper. Each circle will become one layer of petals. Use different sizes for a natural, full-looking flower — the biggest circle goes at the bottom, the smallest at the top.
Place a round object on your paper — a large cup (about 12 cm), a medium cup (9 cm), and a small coin (6 cm) — and trace around them with your pencil. Then carefully cut them out.
Now take each circle and cut petal shapes around the edge — but do NOT cut all the way to the center. Stop your scissors about 1.5 cm from the center. Think of it like cutting a pizza: you’re making slices, but keeping the middle intact.
You can cut round petals (like a rose), pointed petals (like a daisy), or wavy petals — any shape works! Aim for 6–8 petals per circle.
This is the magic step that makes flat paper look like a real, three-dimensional flower! Take a pencil and wrap each petal tightly around it, then release. The petal will hold a gentle curve.
For a flower that opens outward (like a poppy), curl the petals away from the center. For a tightly closed bud, curl them inward. The tighter you curl, the more dramatic the effect.
Now it’s time to assemble! Place your largest circle flat on the table. Put a small dot of glue right in the very center. Press the next-largest circle on top, but rotate it slightly so the petals don’t line up perfectly — offset them by about half a petal width. This creates a full, lush look.
Keep stacking from largest to smallest, rotating each layer slightly. Hold each one down for 10–15 seconds until the glue sets. Finally, add a small rolled paper cone or a button in the very center as the flower’s core.
Your flower head is done! Now give it a stem. Push a green pipe cleaner through the very center of all your layers from bottom to top. Bend the tip into a small loop or hook so it won’t pull back through. That’s it — you have a complete paper flower!
For a straw stem, apply a little glue to the top of the straw and press the flower base onto it. Hold for 30 seconds until secure. You can also wrap the straw in green paper for a more finished look.
Color Ombre
Use lighter shades for outer layers and darker for inner ones to create a stunning gradient effect.
Make It Bigger
Use A3 paper and trace a dinner plate for giant party-worthy blooms perfect for wall decor.
Add Sparkle
Brush the petal tips with glue and dip in fine glitter for a magical, shimmery finish.
Add Leaves
Cut teardrop shapes from green paper, fold down the center, and glue along the stem.
You’re Done — Enjoy Your Flower!
Make a whole bouquet and place them in a mason jar, use them as gift toppers, or arrange them on a canvas for beautiful wall art. Once you’ve made one, you’ll want to make dozens!
“I’m Erin, a crafting expert dedicated to making art accessible and fun for everyone. From jumping origami frogs to beautiful paper flowers, I love designing easy, engaging craft tutorials that spark creativity and bring families together.”
