A complete beginner’s guide — read it like you’re watching a video. No origami experience needed.
⏱ 10–15 minutes⭐ Beginner friendly📄 6 square sheets of paper
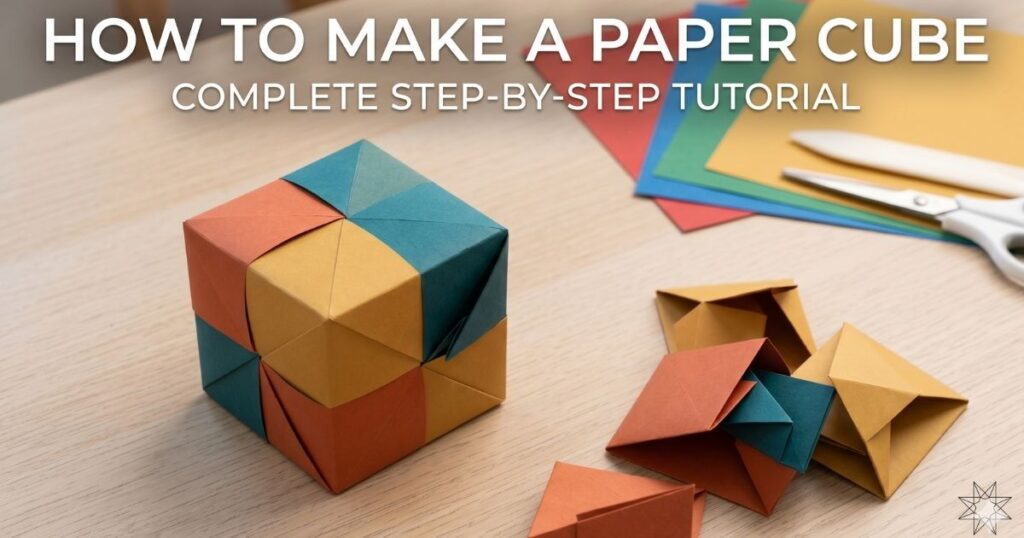
What You’ll Make
A modular paper cube (also called a Sonobe cube or interlocking cube) is made by folding 6 identical square pieces of paper into units that lock together — no glue, no tape, just clever folding. The result is a solid, satisfying 3D cube you can hold in your hand.
This tutorial walks you through every single fold with clear descriptions and visual diagrams, so you can follow along exactly like a video — just at your own pace.
⚡ Before You Start
Each of the 6 sheets of paper becomes one unit. You’ll fold all 6 the same way, then assemble them at the end. Think of it like building with LEGO bricks — make all the pieces first, then snap them together.
What You Need
📄6 Square Sheets Same size, any color
✂️Scissors Optional (if cutting)
📏Flat Surface Table or desk
💡Good Lighting See folds clearly
Best Paper Choices
Origami paper (15×15 cm) is ideal — it’s already square and comes in many colors. Regular printer paper cut into squares also works perfectly. Post-it notes are a fun option for small cubes. Avoid tissue paper or very thick cardstock for your first try.
💡 Pro Tip
Using 6 different colored sheets makes it easier to follow along — and your finished cube will look stunning with one color on each face!
Understanding the Folding Unit
Before jumping into the steps, let’s understand what you’re making. Each sheet of paper gets folded into a “pocket unit” — a flat piece with two pointed flaps and two open pockets. The flaps of one unit slide into the pockets of another to lock them together.
Step-by-Step Instructions
Follow each step in order. Take your time with each fold — a clean, sharp crease makes the cube stronger and more beautiful. Use your fingernail or a flat edge to press each fold firmly.
1
Start with One Square Sheet
Place one square sheet of paper face-down on your flat surface, with one corner pointing toward you (like a diamond shape). Smooth it out so there are no wrinkles. This starting position is important — all your folds come from this orientation.
2
Fold Bottom Corner to Top Corner
Fold the bottom corner up to meet the top corner. You should now have a triangle shape with the folded edge at the bottom. Press the fold firmly with your finger from the center outward to both sides to make a sharp crease. Unfold it back open — this crease is your guide for the next step.
3
Fold Left and Right Corners to Center
Now fold the left corner to the center (where the crease line crosses the middle), then do the same with the right corner. Both side corners should touch the exact center of the paper. You’ll have a narrower diamond shape. Press both folds firmly.
4
Fold in Half Along the Center Line
Fold the shape in half by bringing the top half down to meet the bottom half. Fold along the horizontal center crease you made in Step 2. The result is a flat parallelogram — a slanted rectangle shape. This is the basic unit! The two open ends are the pockets, and the two pointed ends are the flaps.
🎯 Checkpoint
Before moving on, make sure you have 6 identical parallelogram units. Lay them side by side and check they’re all the same shape and size. If any look different, refold them now — consistency makes assembly much easier.
5
Connect First Two Units (Make an “L” Shape)
Take two units. Slide the pointed flap of Unit 1 into the open pocket of Unit 2. Push it all the way in until the flap is fully inserted. The two units should form an “L” shape or a 90-degree angle. This is your first corner of the cube!
6
Add a Third Unit — Form a Corner
Take a third unit and connect it to complete your first 3D corner. The third unit’s flap goes into the pocket of the second unit, while the third unit’s pocket receives the flap of the first unit. You’ll need to bend the paper slightly — this is normal. You should now see a 3D corner, like the corner of a box.
7
Add Remaining Units to Complete the Cube
Now add the remaining 3 units one at a time. Each new unit connects to two existing units — its flap goes into one pocket, and its pocket receives one flap. Work around the cube methodically. The last unit is always the trickiest — you may need to gently flex the cube open slightly to insert the final flaps. Once it clicks together, the cube locks solid!
💡 Assembly Tip
When inserting the very last flap, try holding the cube with one hand and using your thumb to gently flex one face open, creating just enough space for the final flap to slide in. Once it’s in, press the cube firmly into shape.
Your Finished Paper Cube 🎉
Congratulations! You’ve made a paper cube. Hold it up, give it a little squeeze — it should feel solid and hold its shape without any glue. If a corner pops open, just re-insert the flap into the pocket.
Try These Variations
Rainbow cube: Use 6 different colors, one per unit. Patterned cube: Use wrapping paper or newspaper. Tiny cube: Cut your squares to 5×5 cm for a miniature version. Giant cube: Use A4 or letter paper cut into large squares for a palm-sized cube.
Troubleshooting & Tips
My cube keeps falling apart. What’s wrong?
The most common cause is flaps not being fully inserted into pockets. Press the cube firmly on all sides and re-check each connection. Also make sure all your creases are sharp — a soft fold creates loose connections.
The last unit won’t go in. Help!
This happens to everyone! Gently flex the cube open slightly by pushing two opposite faces toward each other (like compressing it). This creates a small gap at the remaining open pockets. Slide the flap in while the cube is flexed, then release.
My cube isn’t perfectly square — it looks lumpy.
This usually means the original paper squares weren’t perfectly square. Make sure all 6 sheets are identical in size. Also, re-check that each unit is folded exactly the same way — even a small difference adds up across 6 units.
Can I make it stronger?
Yes! A tiny drop of glue at each connection point (where flap meets pocket) will make it permanent. You can also use slightly heavier paper — 80–90 gsm paper works much better than thin 60 gsm sheets.
“I’m Erin, a crafting expert dedicated to making art accessible and fun for everyone. From jumping origami frogs to beautiful paper flowers, I love designing easy, engaging craft tutorials that spark creativity and bring families together.”
Written By
Erin
"I'm Erin, a crafting expert dedicated to making art accessible and fun for everyone. From jumping origami frogs to beautiful paper flowers, I love designing easy, engaging craft tutorials that spark creativity and bring families together."