

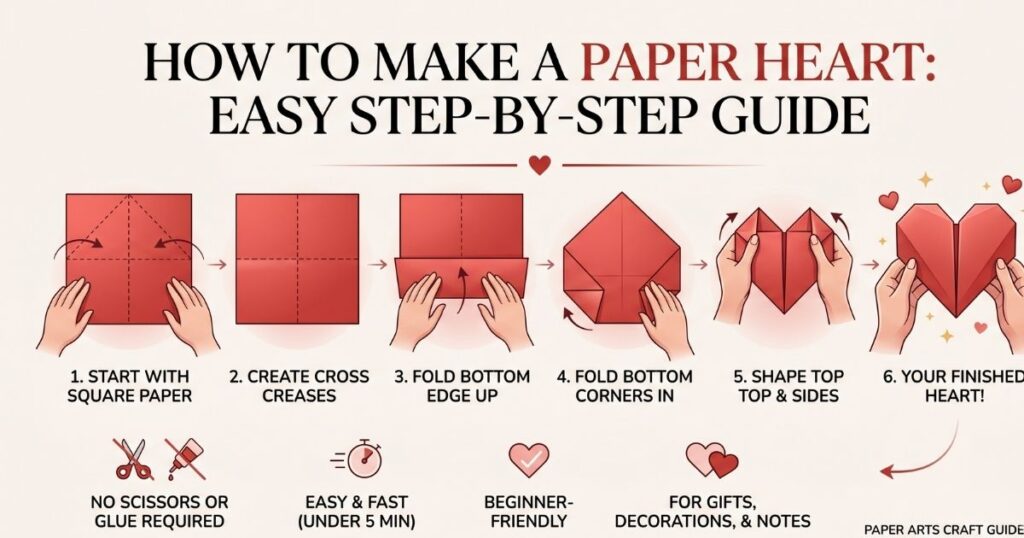
To make a heart with paper, start with a square sheet, fold it in half twice to create cross creases, fold the bottom edge up to the center, flip it over, fold both bottom corners diagonally to the center crease, fold the top corners down, tuck in the side points, and flip the shape over to reveal a heart. The whole process takes less than 5 minutes and requires no scissors or glue — just one piece of paper.
Making a heart with paper is one of those rare crafts that feels magical every single time. Whether you’re preparing a Valentine’s Day surprise, personalizing a gift, decorating a classroom, or simply enjoying a quiet moment of creativity, a paper heart is meaningful, free to make, and requires absolutely no special skills to start.
In this guide, you’ll learn four distinct methods — from the fastest 5-minute beginner fold all the way to an impressive 3D paper heart. Every method is clearly explained with step-by-step instructions, and we’ve included honest tips that most tutorials leave out.
What You Need to Get Started
The beauty of paper hearts is that you likely already have everything required. Here’s what works best:
Square Paper
6×6 inch or 8×8 inch is ideal for beginners. Standard origami paper or printer paper both work.
Scissors (Optional)
Only needed if you’re starting with rectangular paper and need to cut a square. Not required for the main folds.
Pen or Marker
Write a message before folding for a heartfelt note surprise — especially great for the pocket heart method.
Colored Paper
Red and pink are classic, but any color works. Patterned origami paper creates stunning results.
Best Paper for Beginners: Use a 6×6 inch square of standard 20 lb printer paper in red or pink. It’s thin enough for crisp folds but sturdy enough to hold its shape. Avoid cardstock for your first attempt — it cracks at the fold lines.
Method 1: Classic Origami Heart (Easiest — Under 5 Minutes)
This is the most popular paper heart technique in the United States, taught in schools, shared on TikTok, and folded in millions of homes every Valentine’s season. It produces a clean, flat heart that looks great as a card insert, decoration, or handwritten note.
What you’ll need:
- One square sheet of paper (any size — 6×6 inch recommended)
- A flat, hard surface to fold on
- Your fingers to press the creases sharp
Step-by-Step Instructions:
Create Your Base Creases
Place the paper white/plain side up on a flat surface. Fold it in half vertically (top to bottom), press the crease firmly, then unfold. Next, fold it in half horizontally (left to right), press, then unfold again. You now have a cross-shaped crease in the center of your paper.
Fold the Bottom Edge Up
Fold the bottom edge of the paper upward so it meets the horizontal center crease you just created. Press the fold flat. Your paper should now look like a rectangle that’s half the height of the original square.
Flip and Create the Diagonal Folds
Turn the paper over (flip it horizontally). Now fold the lower-left corner diagonally upward so it aligns with the vertical center crease. Press flat. Repeat with the lower-right corner, mirroring the fold on the opposite side.
Fold the White Inner Triangles Inward
You’ll notice small white (or lighter) triangular sections peeking out at the bottom where your diagonal folds meet the colored paper. Fold these inward along the crease line where the two colors meet. This creates a clean edge at the bottom of the heart.
Shape the Top of the Heart
Fold all four top corners downward so they meet the center crease. Then fold the two remaining top points down at a slight diagonal angle — these form the two rounded bumps at the top of the heart. There’s no single “correct” spot; fold them where it looks most heart-like to you.
Flip and Reveal Your Heart
Carefully turn the entire model over. You should now see a clean, symmetrical heart shape. If anything looks uneven, gently adjust the top rounded folds from the other side. Your origami heart is complete!
⭐ Pro Tip: Run your thumbnail (or a ruler) firmly along every single crease after you make it. Sharp creases are the #1 secret to crisp, professional-looking origami hearts. Loose or soft folds result in messy shapes.
Method 2: How to Fold a Heart-Shaped Note (Pass It On Method)
This is the classic method for passing a love note in heart form — the kind that’s been folded in American school hallways for decades. Instead of a square, this method uses a standard rectangular piece of paper (like a letter-size sheet) and turns it into a sealed heart envelope.
Write your message on the paper before you start folding. Then follow these steps:
Start With a Rectangle
Use a standard 8.5×11 inch piece of paper. Write your note on the inside (blank side). Fold the paper in half lengthwise (hotdog fold), crease sharply, then unfold.
Fold the Corners In
Fold both top corners down to meet the vertical center crease, forming a triangle point at the top (like making a paper airplane). Press flat.
Fold the Triangle Down
Fold the triangle point downward toward the center of the paper, leaving about 1/3 of the remaining rectangle showing at the bottom.
Fold the Bottom Strip Up
Fold the bottom portion of the paper upward so it covers the triangle fold. Tuck in both bottom corners at an angle to follow the slanting edges of the triangle beneath.
Tuck the Flap In and Shape
Tuck the top triangular point into the pocket created by the folded bottom strip. Shape the top of the heart by gently separating and rounding the two upper points. This creates the characteristic heart “bumps.”
Method 3: 3D Paper Heart (Impressive but Simple)
A 3D paper heart looks complex but is surprisingly achievable. This version stands upright and is perfect for table centerpieces, Valentine’s decorations, or as part of a handmade card.
What’s different about the 3D heart?
Unlike the flat origami version, the 3D heart uses a unique preliminary fold structure (called a “waterbomb base” in origami terminology) to create depth and volume. The key steps are:
- Fold a square paper diagonally in both directions to create an X crease, then fold horizontally and vertically to create a + crease. All four crease lines should intersect at the center.
- Push the horizontal and vertical folds inward while pulling the center point upward, collapsing the paper into a small square (the waterbomb base).
- Fold both bottom corners of the base up toward the top point. This starts building the heart shape.
- Fold the top single-layer corners downward approximately 1 cm inward to create the rounded top of the heart.
- Fold the side points inward to taper the heart’s waist.
- Gently blow air into the small opening at the bottom of the shape. The heart will inflate into a 3D form. Shape by pressing gently with your fingers.
⭐ Size Tip: For 3D hearts, use paper that is at least 8×8 inches — larger paper makes inflation much easier and creates a more dramatic shape. Smaller paper tends to resist inflating cleanly.
Method 4: Origami Heart With a Secret Pocket
This elegant version includes a small pocket on the back where you can slip a note, a small photo, or a little gift card. It’s especially popular in the United States for Valentine’s Day, Mother’s Day, and school friend exchanges.
How the pocket version works:
The construction is similar to the classic origami heart but uses an additional fold in Step 3 that leaves a layer open at the back. Instead of pressing the back fully flat, you keep a small flap free, creating a naturally formed pocket about 1.5 inches deep — just wide enough for a folded note or small card.
Best For
Gifting a love note, including a gift card, or adding a pressed flower.
Best Paper Size
8×8 inches minimum so the pocket is large enough to hold contents.
Time Required
About 8–10 minutes for beginners.
Creative Uses for Paper Hearts in the USA
Once you know how to fold a paper heart, you’ll find reasons to make them everywhere. Americans use paper hearts for a wide range of occasions:
- Valentine’s Day (February 14): Fold hearts from patterned origami paper, string them together, and hang as a banner. Or tuck a folded note-heart into a lunchbox.
- Wedding & Anniversary Decorations: Scatter flat origami hearts as table confetti or string dozens together as garlands down the aisle.
- Mother’s Day & Father’s Day Gifts: Kids can fill paper hearts with handwritten messages and present them as homemade greeting cards.
- Classroom Activities: Teachers across the US use origami hearts as math lessons (fractions, symmetry) and fine motor skill exercises for K–5 students.
- Gift Wrapping Embellishment: Fold a heart from coordinating wrapping paper and attach it as a unique gift tag.
- Random Acts of Kindness: Leave folded hearts with encouraging notes in public spaces, libraries, or hospital waiting rooms — a growing trend in American communities.
- Holiday Ornaments: Use 3D paper hearts as lightweight Christmas or Valentine’s tree ornaments by threading a small loop of ribbon through the top.
Comparison: Which Paper Heart Method Is Right for You?
| Method | Difficulty | Time Needed | Paper Type | Best Use |
|---|---|---|---|---|
| Classic Origami Heart | ⭐ Easy | 3–5 min | Any square paper | Cards, decorations, gifts |
| Heart-Shaped Note | ⭐ Easy | 2–4 min | Rectangular (letter-size) | Passing notes, love letters |
| 3D Inflated Heart | ⭐⭐⭐ Intermediate | 10–15 min | Square, 8″+ recommended | Centerpieces, impressive gifts |
| Pocket Heart | ⭐⭐ Easy–Medium | 8–10 min | Square, 8″+ recommended | Enclosing notes or small cards |
Pro Tips for Perfect Paper Hearts Every Time
After thousands of folds, experienced origami artists agree on these practical tips:
- Always fold on a hard, flat surface. A tabletop or hardcover book gives you the resistance needed to make crisp, clean creases. Folding in the air or on a soft surface creates uneven shapes.
- Press every crease at least twice. Run your thumbnail or a flat tool (like a bone folder) along every crease twice. This single habit dramatically improves the sharpness of your final heart.
- Fold slowly when learning. Rushing leads to misaligned folds that throw off the entire shape. Once you know the steps, speed comes naturally.
- Start with larger paper. A 6–8 inch square is far more forgiving than a 3-inch square. Small paper requires precise folds that are hard for beginners to execute cleanly.
- Test with scrap paper first. Before using that beautiful patterned origami paper, practice the fold twice on plain printer paper so the final result is perfect.
- Use sticky note paper for mini hearts. The adhesive strip actually helps hold the folded shape together, making sticky-note hearts more durable than regular paper mini hearts.
- For symmetry, use a ruler to pre-mark center points. If your hearts keep coming out lopsided, lightly marking the center point with a pencil before folding can help you align folds correctly.
People Also Ask
How do you make a simple heart out of paper?
The simplest method uses one square piece of paper. Fold it in half twice to create cross creases, fold the bottom edge up to the center, flip the paper, fold both bottom corners diagonally to meet the center line, fold the top four corners down, tuck in the side points, and flip the whole thing over. You’ll have a flat, clean heart in under 5 minutes.
How do you fold a heart note out of paper?
Write your message on a rectangular sheet first. Then fold the top corners down to the center (airplane style), fold the resulting triangle down, fold the bottom strip up over it, tuck the corner flaps in diagonally, and slip the triangle point into the bottom pocket. Gently separate the two top bumps to form the heart shape.
What is the easiest origami heart for beginners?
The classic flat origami heart made from a 6×6 inch square is universally considered the easiest. It involves fewer than 10 steps, requires no cutting, and can be completed in 3–5 minutes by complete beginners. Using a 6″ or larger square makes the folds even more manageable.
How do you make a 3D paper heart?
Start with a square sheet (8 inches or larger). Create diagonal and cross creases, then collapse the paper into a waterbomb base. Fold the bottom points upward, shape the top bumps, fold in the side points, and gently blow air into the bottom opening to inflate the heart into a 3D shape. It takes 10–15 minutes and looks impressive with minimal practice.
What size paper is best for making a paper heart?
For beginners, a 6×6 inch or 8×8 inch square is ideal. Anything smaller (like 3×3 inches) makes the folds very difficult to align precisely. Larger paper (10×10 inches or above) is great for display pieces or 3D hearts where you want a dramatic size.
Can you make a paper heart from a rectangle?
Yes. The heart-shaped note method is specifically designed for rectangular paper. You can also cut a rectangle into a square first by folding one corner diagonally to the opposite edge, creasing, and cutting off the excess strip. The remaining folded triangle unfolds into a perfect square.
How do you make an origami heart with a message inside?
Use the pocket heart or heart-shaped note method. For the note method, write on the paper before folding — the completed heart hides your message inside. For the pocket heart, write your note on a small strip of paper and slide it into the pocket on the back of the finished heart after folding.
How do you make a paper heart bookmark?
Fold a square sheet (4×4 inches works well) using the classic origami heart method. Before the final flip, fold the bottom point of the heart upward inside the shape to create a small triangular pocket. This pocket slips neatly over the corner of a book page, creating a functional heart-shaped bookmark.
Frequently Asked Questions (FAQ)
Do I need special origami paper to make a paper heart?
No special paper is required. Standard 20 lb printer paper cut into a square works perfectly for beginners. Origami paper (available at craft stores like Michaels, Hobby Lobby, or Amazon) is thinner and holds creases better, which makes results slightly cleaner — but it’s absolutely not necessary. Avoid thick cardstock for your first few attempts as it’s harder to fold criply.
How long does it take to learn to make a paper heart?
Most people can make a decent classic origami heart on their very first try, especially if they follow the step-by-step instructions carefully. The entire fold sequence takes 3–5 minutes once you know the steps. After 2–3 practice folds, most beginners can produce a clean, symmetrical heart consistently. The 3D version typically requires 3–5 practice runs to master.
What is the best paper color for a Valentine’s Day heart?
Red and deep rose pink are the classic choices for Valentine’s Day paper hearts in the US. Light pink creates a softer, romantic look. White origami paper with gold metallic patterns is elegant for wedding applications. For kids’ classroom exchanges, bright colors like magenta, orange, or purple are popular and fun. Ultimately, any color that feels meaningful to you is the right choice.
Can kids make origami hearts?
Absolutely. Origami hearts are one of the most popular paper crafts for children ages 6 and older. Kids in grades 1–6 across the US regularly make them for Mother’s Day, Valentine’s Day, and classroom activities. The classic flat heart requires no scissors, glue, or sharp tools, making it completely safe for supervised young crafters. Start with 6×6 inch paper for children — it’s easier for small hands to handle than smaller sizes.
How do I make my paper heart more symmetrical?
Symmetry issues usually come from two sources: slightly uneven initial creases or rushing the diagonal fold steps. Fix this by: (1) Always folding in both directions before settling on the crease — if a fold doesn’t line up, unfold and retry; (2) Lightly marking the center point of your square with a pencil dot before you begin, giving you a reference point for every fold; (3) Ensuring your paper is a perfect square before you start, since rectangles produce uneven hearts.
Can I make a paper heart with newspaper or recycled paper?
Yes! Any paper that’s thin enough to fold cleanly works. Newspaper is a surprisingly good option since it’s thin and holds creases well, though the print may show. Magazine pages and wrapping paper also work excellently and add interesting patterns to your hearts. Avoid thick paper towels, cardboard, or laminated paper — these crack at fold lines rather than creasing cleanly.
How do I make a mini paper heart for jewelry or earrings?
Mini origami hearts (1.5–2 inches final size) require a 3×3 inch square. The folds are identical to the standard method but require greater precision with small paper. Use thin origami paper rather than printer paper for this size, as the extra thickness of printer paper makes tiny folds quite difficult. Once complete, a small dab of clear craft glue or Mod Podge seals the shape permanently, making it suitable for jewelry, earring drops, or detailed decorations.
What is the difference between an origami heart and a paper heart?
“Origami heart” typically refers to a heart made using traditional Japanese origami folding techniques — no cuts, no glue, just strategic folds from a single sheet of paper. “Paper heart” is a broader term that includes any heart shape made from paper, including cut-out hearts, hearts made with scissors and glue, folded note hearts, and any other paper-crafting method. In practice, the two terms are often used interchangeably online when describing folded paper hearts.
📚 Sources & References
- Origami.me — Easy Origami Heart Tutorial (Updated March 2026)
- One Little Project — How to Make a Paper Heart
- Mombrite — Easy Origami Heart for Kids (Updated February 2026)
- Doing Good Together — Printable Origami Heart Instructions
- The Craftaholic Witch — 3 Origami Heart Variations
- Origami USA — Standards for Beginner Paper Folding Classification (origamiusa.org)

“I’m Erin, a crafting expert dedicated to making art accessible and fun for everyone. From jumping origami frogs to beautiful paper flowers, I love designing easy, engaging craft tutorials that spark creativity and bring families together.”
